Turtle Wax Headlight Restorer
Tips from the Professional
The Turtle Wax headlight restorer kit is an all-in-one kit that if properly done, can deliver professional level results for your aging, dull, and yellowing headlights.
Nothing is immune to the aging process and your car headlights are no exception.
It is usually only after our headlights have become so discolored over time, that we finally accept that you just can't kick this down the road any longer. Time to go in search of the best way to restore your headlights on your car and do something about.
What I can promise you is that restoring your headlights is one of the most dramatic ways to take years of wear and tear off the appearance of your car! The end result if done properly, is like giving your car a face lift!
Turtle Wax 50764 Drill-Based Headlight Restorer Kit, 8. Fluid_Ounces
Pros:
- Can be used with a drill motor which is much easier and faster when doing the initial sanding to remove discoloration and yellowing of headlights
- Comes with various sanding discs that go from aggressive to fine
- Comes with Clarifying Compound to be used to remove the fine sanding marks
- Comes with protective "coating" as final step to protect newly restored headlight
Cons:
- Does not come with buffing pad attachment to use the Clarifying Compound with
- The "protective" coating may not prove as effective as other headlight restoration kits
Darren's Tips: I really like this kit, but the fact that it does not come with an attachment for your drill motor for the final polishing step to remove the sanding marks is very confusing to me.
You will be required to polish out the sanding marks using a micro fiber cloth and performing this step by hand. This may not seem like a big deal to you until you are required to do it. You will instantly realize how time consuming polishing the headlight by hand will be in comparison to using the drill motor.
Because of this one big variable, I give this kit a thumbs down!
Turtle Wax Headlight Restorer
Going from good to better...
The Turtle Wax Headlight Restorer kit is a great kit, but as noted from above, it still has its limitations to what I would consider as a professional to be the most ideal kit.
Like every other bundle or kit manufacturers seem to put together as an all-in-one kit, they generally miss the mark in some way. I can always tell they did not have an actual professional behind the development process.
But with that said, I will lay out the various options to the Turtle Wax kit and yu should be able to walk away with full knowledge as to what kit seems most ideal for you.
Best Headlight Restorer Kit:
What Would Darren Do (WWDD)
Since I am asked so frequently what I would do, I am going to give you my best pick for a headlight restoration kit and I am going to separate this into two (2) options for you:
- The first option is based on a headlight restoration kit that requires the use of a drill motor
- the second option requires no drill motor and is a headlight restoration kit by hand only
Headlight Restoration Kit:
Drill Motor Required
3M Headlight Lens Restoration System, 39008
Pros:
- All of the sanding discs and the polishing pad can be attached to drill motor
- Restore headlights like a professional
- The exact kit I recommend to anyone
- So much easier than trying to restore headlights by hand
Cons:
- The only con I see with this kit is that it has no protective coating to be applied after you complete the headlight restoration process
Darren's Tip: Hands down I prefer this kit to virtually any other kit, including the Turtle Wax headlight restorer kit. While there are so many headlight restoration kits available, I have not tried them all. But this kit performs excellent!
Having the ability to perform all the required steps to sand away the hazing and yellowing of aging headlights, as well as a polish pad to polish away the sanding marks is so much easier than any kit requiring you to restore your headlights by hand.
But you may not have access to a drill motor and therefore would naturally default to a headlight restoration kit that you can use by hand only. for that kit you can se my next recommendation.
CERAKOTE Ceramic Headlight Restoration Kit
- No power tools required
- Comes with unique pre-wipe to remove partial discoloration
- Comes with sanding discs to sand away oxidation of headlights
- Comes with unique wipe sealant to keep headlights protected
- Comes with limited lifetime guarantee
Darren's Tips: once again we have a classic case of trade-off's. The main benefits of this headlight restoration kit are the ability to restore your headlights with the use of no power tools, and the unique permanent coating that will protect your newly restored car headlights.
But you are also back to more time consuming effort required if you do not have, or do not want to use a drill motor to perform the headlight restoration.
But this kit also contains the permanent protection that you will not get with the 3M headlight restorer kit. I would choose this kit over the Turtle Wax headlight restoer kit just as I would choose the 3M headlight restorer kit over the Turtle Wax headlight restorer.
It really comes down to the choice between restoring your headlights by hand, or machine as well as getting a protective coating to apply when you are finished.
Headlight Restoration Kit:
No Power Tools Required
Can You Make Dull Headlights Clear Again
Yes!
That is the good news.
The bad news is that many of you reading this have probably heard a lo of bad information as to how to restore headlights, what to use, and ineffective alternatives that are nothing more than short cuts to a job that will require some effort on your part.
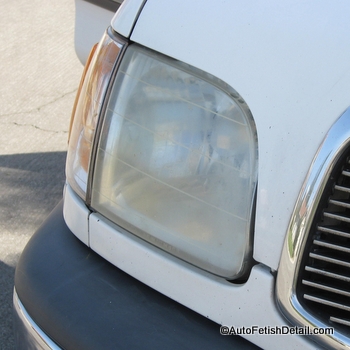
Before Headlight Restoration
After Headlight Restoration
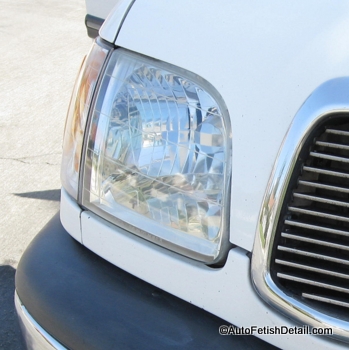
But with today's headlight restoration kits, you have the ability to produce professional grade results at home, doing this yourself.
The Turtle Wax headlight restorer kit is a perfect example of the many headlight restorer kits available.
How Do You Restore Car Headlights
This is a common question that usually delivers up a review of the many car headlight restorer kits available.
The
problem with this question is that most people don't understand the
actual headlight restoration process. If you don't have a working
understanding of the actual headlight restoration process, you will be
searching for the best headlight restoration kit based on limited
knowledge.
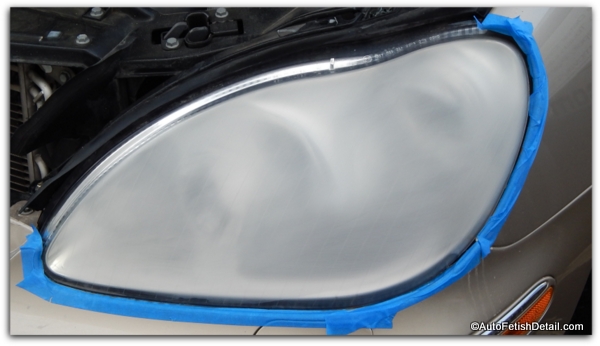 This is during the headlight restoration process. I have sanded off the original clear coat of this headlight on a Mercedes plastic headlight. This is to show what your headlight should look like after using sand paper to sand away all the original clear coat. The next step is to polish the plastic headlight to perfection.
Limited knowledge usually translates into limited desired results. Indicators suggest you are wiling to put in the effort, therefore I want to make sure all that effort does not leave you disappointed!
Headlight Restoration Process starts with the beginning of your car:
- Every headlight, on every car will have a clear coating (this is just like the clear coating on your car paint, except usually a cheaper version which is why headlights discolor and fail much sooner than your car paint)
- This clear coat is applied to each headlight as a form of UV inhibitor (the quality and thickness of this UV clear coat determines how long it lasts)
- As the clear coat on each headlight ages, it becomes less and less transparent as it dulls and yellows
- In order to restore the headlight properly, this original clear coat must be removed
- Sand paper (usually in the form of sanding discs) are used to literally sand this original clear coat off the headlight lens itself
- Once the entire layer of original clear coat has been completely sanded off, then compound or polish is used to polish away the sanding marks to reveal a perfectly clear and original looking headlight lens
Darren's Tips: I state that the original clear coat must be removed in order to restore your headlights. This really is based on you and the desired results you are after.
What this means to you is that you do not necessarily have to remove the original clear coat completely. But if you don't, you have to accept that your results will be less than ideal.
The best move is to take the time and patience to sand away the original clear coat 100% before you move on to polishing away your sanding marks.
During Polishing Stage
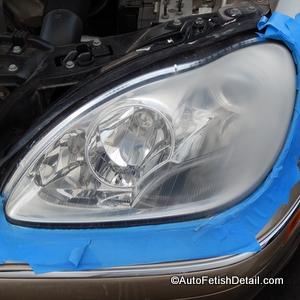
Completed Polishing Stage
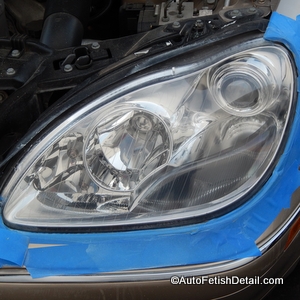
The two pictures illustrate the polishing stage to remove the sanding marks that remain after you have sanded away all discoloration, yellowing, or hazing of the original clear coat.
The first picture shows the half-way results as I have only polished half of the sanded headlight. You can still see the hazed-up section on the right side of the headlight that still has sanding marks present.
The other picture shows the completed restored headlight after I had polished away all sanding marks to restore this headlight to perfect clarity.
How Do You Restore Plastic headlight Lenses
This is a common question that is based on people's overall lack of experience. Virtually every headlight on every car is made of plastic. Many people today still think headlights are made of glass. While glass headlights still exist, they are very uncommon even on the most expensive of cars.
How to restore plastic headlights is done using the same process as I outline just above.
- You sand away the original clear coat
- You polish your sanding marks to create a perfectly clear headlight
- You apply a new clear coat, or protective coating if supplied in the headlight restoration kit you have chosen
Darren's Tips: based on the Turtle Wax headlight restorer kit or any of the alternative kits I lay out further down, your chosen kit may or may not come with any form of clear coat or protective coating to apply as your last step.
If the headlight restorer kit you choose does not contain any clear protective coating, then you will need to apply traditional car wax over your freshly restored headlights. And you will need to do this as frequently as you wax your car. The more often the better!
Can You Use Tooth Paste To Restore Headlights
Yes. But you can also use baking soda and water. You can also mix tooth paste and baking soda together and use that.
But either of these methods will prove severely ineffective in most cases to restore your headlights. I truly recommend one the the kits below if you want professional results!
Tooth paste and/or baking soda to restore headlights simply is not aggressive enough to sand or polish away the original clear coat on your headlights that is causing the yellowing and fading.
Only sand paper and/or aggressive compound will prove effective.
Turtle Wax Headlight Restorer
Final Summary
If you have made it this far down this Turtle Wax Headlight Restorer review, you are now among the minority of people. And I say this in a very good way as most people are simply unwilling to put in the effort to become fully educated and informed.
While restoring your car headlights yourself is very doable with the latest in headlight restoration kits, there still remains nuances and variables many people do not consider.
My hope is that I have covered the most important questions you may asked when thinking on how to restore headlights at home. Just know that if you follow my tips on this page, along with the instructions in whichever headlight restoration kit you choose, you should be very happy with your final results.
I can tell you from firsthand experience that most people do not realize just how old yellowing, hazy, dull, or foggy headlights can make your car or truck look! Once you have restored your headlights you will be so happy you took the time and effort to do it!
Sincerely,
Darren Priest
|
|


